
Taking a screenshot on a Mac is one of those simple tasks that can save you a lot of time—whether you’re sharing information, saving receipts, or troubleshooting something. If you’ve ever wondered how to screenshot on Mac, you’re in the right place.
This guide walks you through how to take a screenshot on Mac, how to crop a screenshot on Mac, and even how to edit and organize them. The steps are straightforward, and once you learn them, you’ll probably use them every day.
How to Screenshot on Mac Using Keyboard Shortcuts
The fastest way to learn how to screenshot on Mac is by using built-in keyboard shortcuts. macOS includes multiple options depending on what you want to capture.
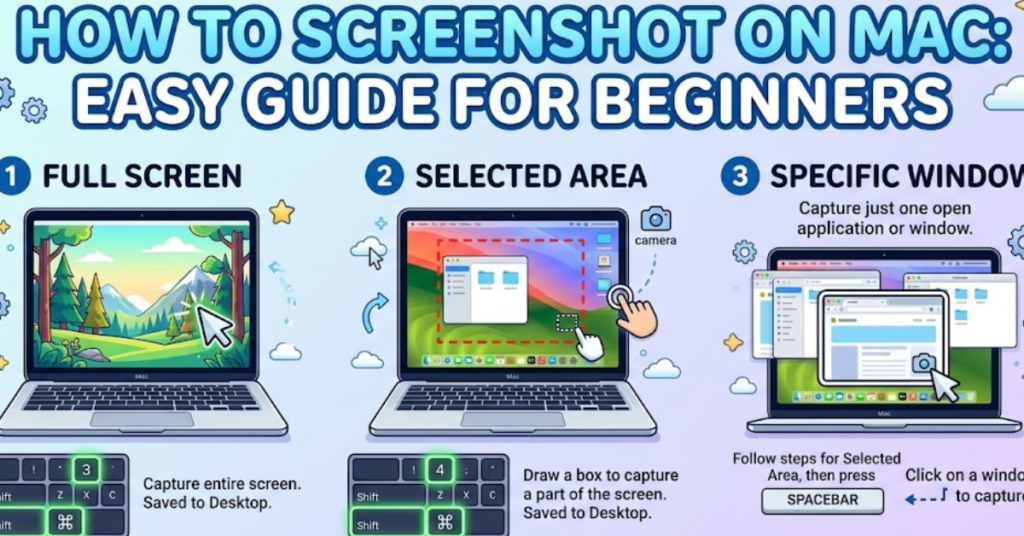
Capture the Entire Screen
Press:
Command (⌘) + Shift + 3
This will instantly capture your entire screen and save it to your desktop.
Capture a Selected Portion of the Screen
Press:
Command (⌘) + Shift + 4
Your cursor will turn into a crosshair.
Simply click and drag to select the area you want to capture.
This is the most common method when learning how to take a screenshot on Mac.
Capture a Specific Window
Press:
Command (⌘) + Shift + 4, then tap Spacebar
Your cursor turns into a camera icon. Click any window to capture only that window.
How to Use the Mac Screenshot Toolbar
Mac also provides a built-in screenshot toolbar for more control.
Press:
Command (⌘) + Shift + 5
You’ll see options like:
- Capture entire screen
- Capture selected window
- Capture selected portion
- Record screen
- Choose save location
- Set timer
This toolbar is ideal if you frequently take screenshots and want more flexibility.
How to Crop a Screenshot on Mac
After learning how to crop a screenshot on Mac, you can quickly remove unnecessary parts.
Method 1: Crop Using Preview
- Double-click the screenshot
- It opens in Preview
- Click and drag to select area
- Go to Tools > Crop
- Press Command + K
Done! Your screenshot is now cropped.
Method 2: Crop Using Quick Markup
- Take a screenshot
- Click the thumbnail that appears
- Use selection tool
- Click Crop
- Save changes
This method is faster for quick edits.
Where Do Screenshots Go on Mac?
By default, screenshots save to:
Desktop
File name format:
Screen Shot [date] at [time].png
You can change the location:
- Press Command + Shift + 5
- Click Options
- Choose new save location
How to Copy Screenshot to Clipboard Instead
If you don’t want files cluttering your desktop:
Add Control to any shortcut:
- Command + Shift + Control + 3 → Copy full screen
- Command + Shift + Control + 4 → Copy selected area
Then paste using Command + V.
Pro Tips for Taking Better Mac Screenshots
- Hold Shift while dragging to adjust selection
- Hold Option to resize from center
- Use screenshot timer for clean captures
- Turn off shadows for window screenshots
- Use Preview to annotate images
Common Screenshot Shortcuts Quick Reference
| Action | Shortcut |
| Full screen | Command + Shift + 3 |
| Selected area | Command + Shift + 4 |
| Window screenshot | Command + Shift + 4 + Space |
| Screenshot toolbar | Command + Shift + 5 |
| Copy to clipboard | Add Control key |
FAQs About How to Screenshot on Mac
How do I take a screenshot on Mac without keyboard?
Use Command + Shift + 5 to open the screenshot toolbar and click options.
How to crop a screenshot on Mac after saving?
Open it in Preview, select the area, and press Command + K.
Can I change screenshot format on Mac?
Yes. Use Terminal or third-party tools to switch from PNG to JPG.
Why is my screenshot not saving?
Check screenshot location in Options using Command + Shift + 5.
How do I screenshot on Mac and paste immediately?
Use Command + Shift + Control + 4, then paste with Command + V.
Conclusion
Learning how to screenshot on Mac is simple once you know the shortcuts. Whether you’re capturing the whole screen, selecting a specific area, or figuring out how to crop a screenshot on Mac, macOS gives you powerful built-in tools.
Start with Command + Shift + 4 for flexibility, use the toolbar for advanced options, and crop using Preview for quick edits. Once you get comfortable, you’ll be taking clean, professional screenshots in seconds.